
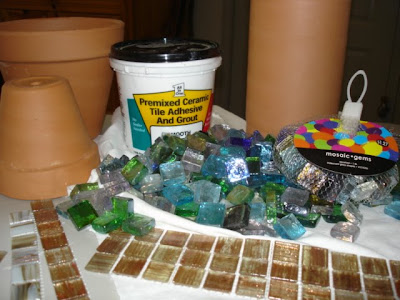

 I have always enjoyed making mosaic projects, especially flower pots...I have never taken a mosaic class, but just jumped in one day and and gave it a shot. I have learned a lot since then, but here are the basics. I use an adhesive grout and just apply the grout to the pots. I cover a small area first, being careful to evenly spread the grout. I use a plastic fork or spoon for spreading, or sometimes I use my fingers (wear gloves!). The depth of the grout depends on what kind of glass tiles or pieces you are using.
 Then I just start laying down rows of tiles. These glass tiles came from Hobby Lobby and they were especially inexpensive but they are very thick so I used a thicker layer of grout.
 These tiles are for flooring or back splashes and came from a home improvement store. They are very thin so I used a thinner layer of grout.
 These tiles made beautiful pots in lovely neutrals with a hint of metallic sparkle in the glass tiles.
 I also have used ceramic tiles and they make great pots too!
 And I have used fancy glass tiles and they have their merits as well.
 On the far right is a mosaic pot made from an old cracked dinner plate. This pot is probably 4-5 years old, so it has some discoloration at the bottom from water.
 This is a clay jar that I found and covered with the thick glass tiles for a wine bottle cooler.
 Here are a few tips: Once the tiles are arranged as you want them, allow the pot to dry for maybe 3-4 hours. Then you will want to wipe the haziness off the tiles so they are easier to clean up. Regular grout will not allow you to do this after it is dried, but the adhesive grout will. Allow it to dry for 2-3 days, then you might need to fill in the cracks with more grout. I use a moist sponge and smooth more adhesive grout into the cracks and crevices. Allow it to dry for 2-3 days. Then use a sandpaper block to clean off the rough parts of the dried grout or you can scrub it with a brush and warm water to remove loose bits. I sometimes use a knife to scrape larger chunks of grout off of the pot.
 I let the mosaic'ed items sit for a few weeks and coat them inside and out with a clear spray paint (the Wal Mart brand works fine) to keep the moisture out.
I made this tray for the top of my toilet tank from a thrift shop wooden tray ($1) and flattened marbles. It adds a lot of color to the bathroom!

8 comments:
Love these!
Love these! They look like something expensive and store bought, great job!
I have always been a little afraid to try mosaic but you make it sound so easy and wow, what gorgeous finished projects!
These have been on my to do list forever! They look wonderful, you gave me some inspiration to get moving with it.
Love all the different tiles you used!
these are great! def better than store bought ones!!!
I love doing mosics like this - just one word to the wise that we have learned the hard way - clay pots are porous, so if you do not seal them in some way before doing the tiles, the tiles will eventually fall off from the water from the plant leaking through (we had 3 pots just lose all their tiles one day!). Just do a coat of acrylic paint all over the pot first before tiling. Just thought you'd want to know! They look so beautiful!
I spray coat the insides of the pots (as well as the outsides) after they are mosaic'ed...that seals the moisture from the inside and outside of the pots.
I love your ideas Ellen. I am signed up as a follower. Love your style girl.
Post a Comment