Tuesday, August 31, 2010

I was featured! And I won a giveaway!

I was featured for my Braided Headbands project last week on along for the ride! I love Laura's blog...she also lives in Columbia and has a great blog!
 
And then the next day Laura announced I had won the giveaway from Scraps and Scribbles!
What a great week!
 
My Craftie Life
UndertheTableandDreaming

And this week I was featured on My Craftie Life and on Under the Table and Dreaming for my Making Wash Cloths post!
 

These Magical Years
Yvonne at These Magical Years is featuring my Wool Felt Pumpkin Tutorial on her blog today!


Photobucket


I was also featured for my paper circles garland on Creative Itch's Sew Cute Tuesday!
monogram
Tasha featured my birthday buntings on her blog post today @ Creation Corner...

It doesn't get any better than that!
Hope you have a great week too!!

.

Sunday, August 29, 2010

Felted Birdsnest with Robin Eggs

The nest used to be a brown lambswool sweater...I felted it and made a large "flower" using this technique
Then I wet felted three robin eggs from robin egg blue wool roving I bought from a very nice seller on etsy.  The roving was gorgeous and the seller very generous!
I thought it turned out really nice.  I have also seen these nests made very small for brooches.
I snuggled the nest down in the Moonflower vine for some photos...you can see a bloom just starting to open at the top.
These flowers never cease to amaze me....
Definitely God's work...
all around us.

Thursday, August 26, 2010

I hate to buy washcloths!!

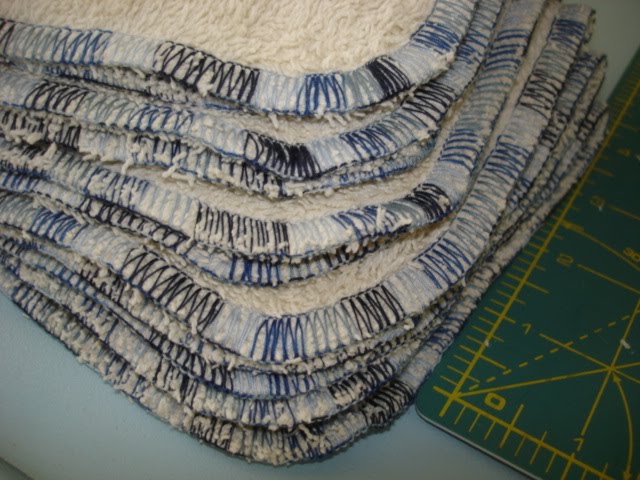
These are some of my washcloths...they are all exactly the same size.  They stack nicely on the shelf. 
They are all made by me....because I hate to pay almost as much as for a washcloth that I do for a towel, especially when my son uses them to wash his car, wipe dog poop off his shoes, and clean up spills on the floor. So I can't see paying $4 for a washcloth for those chores!
So when a towel starts to wear out, gets stained or has a hole in it, I recycle it into anywhere from 6-8 washcloths.  First of all I cut off the end where the decorative band is.  It tends to shrink more than the rest of the towel and I don't like how it is puckered.  I use my rotary cutter and ruler and make short work of it all!
I cut 10.5" squares.  Later I will round the corners when I stitch the edges. 
I was able to get 6 squares out of this towel. 
Next I am going to bind the edges with my serger.  If you don't have a serger, you could use an overcast stitch to stitch the edges.  If you use a regular machine, you will need to round the corners prior to stitching.
I start on one corner and serge all around the edge,
rounding the corners as I go.
Here is the finished product...they will be a bit ragged until they are washed a few times.
I love that thread...this was the first time I had used it.  It has a heavier weight feel to it, not quite as thick as quilting thread, but thicker than regular sewing thread.  And it was only 97 cents at JoAnn Fabrics.  Usually I use white thread, once I used a rayon embroidery thread, but it didn't last very long. 
Here they are stacked on the bottom of my washcloth shelf.  I always buy Martha Stewart towels so the well worn towels make nice thick but soft wash cloths! 


Tuesday, August 24, 2010

Donated Mizzou Quilt

This is the quilt I am donating for the live auction at our church's fundraiser.  I used three different Mizzou fabrics, two for the front and a third one for the back.  I just made a simple pattern, nothing fancy.  My aunt Marge quilted it for me on her ginormous long arm quilting machine.  She always does such a wonderful job. 

I love surprises on the backing.  I used a leftover strip from the front piecing.
Sure hope it does well during the auction!!

Girly Name Buntings

I have been wanting to make some bunting after seeing lots of bunting and garlands in blogland.  My great nieces 3rd birthday is coming up so I decided to make some garland and some bunting for her party. I found this fabric at WalMart, got 3/4 yard of it for less than $3. 
I cut it into triangles 7" long across the base and about 10 inches long. 
I cut enough to make my 4 month old great niece a bunting too, so I needed a total of 22 triangles.  Well, I was able to cut 23 triangles out of that much fabric, so it worked out perfectly!
I sewed a single seam around the raw edges, with two pieces with the wrong sides together, just to give it some body and give it a more finished look.
Then I sewed the appropriate number of triangles to a white ribbon that would be on the back of the bunting.  By the way, I just ordered one of the "sweet deals" from The Ribbon Retreat...so I had lots of new grosgrain ribbon that I needed to try out. 
Then I sewed the colored ribbon on top of the white ribbon close to both edges.  I used orange on one and bright pink on the other one.
I bought iron on letters from Hobby Lobby with a 40% off coupon and ironed on, not measuring, just guesstimating the placement of the girls' names.  These letters were really easy to apply, you just peel the letter off the sheet and iron it on for 15 seconds.  Too easy!
The black letters really pop on the bright fabrics...

My niece can use Elena's for her birthday party and then use them both for decorating the girls' room!

Saturday, August 21, 2010

Circle Party Garland

I have been wanting to make one of those circles garlands...I saw it somewhere on a blog (sorry but I can't remember where!) and my niece's birthday is coming up, so that is a good excuse!
I got out my trusty Fiskars circle cutter and cut many different size circles from many different color card stock.  Nothing fancy, took me maybe 10 minutes to cut all that I used in the garland.
Then I just started sewing them together, leaving maybe an 1/8-1/4 inch between each circle.
I just kept feeding them in one at a time.  I did set my stitch length longer at 3.5 so there wouldn't be as many holes in the paper.  I used white thread for mine, but it would be cool to use a variegated thread too!
These pictures aren't the best and the background is certainly distracting, but I think you can get the idea!
I am really proud of it...it is fairly sturdy too.  I stacked the circles on top of each other to store it so it doesn't get damaged before the party.
I am thinking that it would be very cute to scatter some flower die cuts into this mix!

Friday, August 20, 2010

Braided Headbands

I was blog browsing this evening and saw a post by Lorie at Be Different...Act Normal about braided headbands. 
She had seen a blog post at Skip to My Lou about the headbands and was just passing the idea along.  The Skip to My Lou had a great tutorial and I had this pretty 3/8" blue ribbon sitting by my chair from another project.  So, I tried it and it was really easy (especially with the great tutorial). 
So I found some navy 1/4" ribbon and made another one. 

I liked it even better, it was narrower because this ribbon was narrower.
So, another easy craft for a rainy evening completed!