Saturday, July 31, 2010

Mmmmm....Cupcakes

I thought I would show off some of my newest cupcake creations....

These were both made from old Old Navy wool sweaters....I just love their bright colors and designs.
The pattern to make these can be found in several of Betz White's books, Warm Fuzzies: 30 Sweet Felted Projects and Felt So Good: Over 30 Irresistibly Cute, Cosy and Colourful Felted Projects.
I didn't follow her directions completely, but made my own adaptations (as usual)!
I will be listing these in my etsy shop this weekend...take a look!

Rolled Felted Wool Roses Tutorial

Aren't these cute?  I have been wanting to make some of these...

I have made all sorts of colors and styles, some look more like roses, some more like zinnias, some, well, some just don't look like any flower I have ever seen!  But I do know they do look good on headbands and hair pins and they make excellent pins/brooches.
You start with some felt scraps, you can use felted wool as I have, or you can use regular felt.
You cut strips of the felt, the wider the strip, the taller the flower. The shorter the strip, the smaller the flower. Taper each end in width to create a realistic rose appearance.
Now roll them up, experimenting with how it looks, if you don't like it unroll it and either trim or change the end you start the roll with.

Make it look however you want it and then stick a straight pin all the way through the side, catching the end under the pin.  Please do not laugh at my hot glue gun that came over on the Mayflower...my brother gave it to me and he got it at an auction.  The great thing about it is that it is cordless.  Pop it off the base and it lasts for 10 min or so...makes all sorts of projects very easy!
Next cut a square (or you can cut a circle) a bit bigger than your flower, in the same color felt.
Next put a glob of hot glue just a bit smaller than your rosette on the square.
Now, keeping your fingers away from that hot glue, gently push the back onto the rosette.
Apply a dot of hot glue under neath the end of the felt strip and remove the straight pin.
Allow the hot glue to cool a bit and then trim the extra around the rosette off.  Do I need a manicure or what??
So it looks like this on the bottom...
Cut out a felt leaf slightly wider than your rosette.  And center and glue the rosette onto it. The leaf is optional...
You can leave the flower standing up or you can fold the "petals" down so the flower is wider.
See the difference between the top two pics?

I have bunches of these now!
I love the way they look...the dark pink ones I made from ribbing at the bottom of a wool sweater.


I like how it looks kinda nubby.
The brown flower is a lot prettier in person (or in flower I guess).  Much like me, it doesn't photograph so well. 

Friday, July 30, 2010

Free Stuff Friday at Lauren's Hope Blog

Source
I was checking out Facebook this morning and found a link to this blog.  Of course being nosy,  I checked it out!  Lauren's Hope Blog is having a giveaway-you can enter to win one of three different medical identification pieces.  I visited http://www.laurenshope.com/ to see what they have to offer.  Their site provides stylish alternatives to medical alert identification. There are lots of styles for children, lots of trendy womens bracelets, necklaces, anklets and teenage compatible styles.
I found this on their home page.
"We provide a full line of personalized medical alert jewelry for those with any condition that requires you to wear a medical ID. Our classic designs include beaded and link medical ID bracelets that attach to a blank or custom engraved alert tag with the medical symbol, as well as personalized medical identification necklaces for men and women. Kids love our fun styles like the dog tag ID necklace, sports and flower medical pendants and waterproof adjustable medical sport bands. Your busy life requires many options so we also offer medical ID watches, ankle bracelets with Caduceus charm, Food Allergy tattoos, luggage/backpack tags personalized with the medical symbol, DIABETIC DRIVER car window decals, stainless steel water bottles and more. Our creative and stylish medical jewelry is designed with 925 silver, 14kt gold-filled, 316L Stainless Steel and leather and makes a perfect gift for men, women, boys and girls."

Below are the three choices for the drawing today

This beaded one is my favorite for this week's Free Stuff Friday!

Go check them out!  Entry into the drawing is until 4 pm CST today.

Thursday, July 29, 2010

Big Zipper Flower

I have been wanting to make some zipper flowers ever since I started seeing them appear in blog land....I have been collecting the zippers here and there cheap.  I studied many of the online tutorials and of course didn't really follow any of my own, I sort of created my own style! 
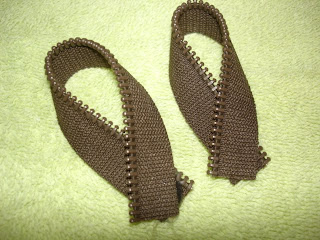
Since I have been doing more "lap crafts" I decided to give these a try. I chose the chocolate brown zippers for the outside petals and a rich yellow for the inside petals.  I cut the outside pieces 5.5 inches long and the inside 4.75 inches long.  I cut off the metal ends and took off the pull too (Any ideas on what to do with the pulls?  I am sure there must be something crafty out there that would be cool!).
I folded all the pieces in this oval shape and hot glued them together like that. Watch those fingers!  I currently have two hot glue gun blisters from this project last night...
Now these two pictures aren't the flower I made in the picture above, but I forgot to take pictures of that one.  So anyway, follow along with me...I just started hot gluing the petals that I made together aligning them the same each time, until you have a full circle of the outside petals.  Just repeat with the inside petals and use the base of the outside petals to start the circle of the inside petals.
And ta..da...here is the finished product!  I had a this grossgrain ribbon flower that looked great in the center of this flower, so I hot glued it on!  You could also use a fabric covered button in the center too...probably a 1 1/8 inch button would be perfect.
So my first zipper flower!  I made a pin out of this one...just glued a pin back on and it was all done!

Making Lemonade


You know that saying "when life gives you lemons, make lemonade"?  Well that is what I am doing!  I have had surgery on my ankle and calf a week and a half ago.  So here I sit watching HGTV (The Unsellables) with ice on my ankle, with my lovely tie dye cast!  It makes me sort of crazy because I had so many projects planned....
Like this really cool chair I bought at St. Vincent de Paul Thrift Store one the last time I was in St. Louis...it clearly needs to be reupholstered!  The really incredible thing is that this chair is solid as a rock, very comfortable, and cost me only $3!!!  I am quite proud of this purchase...I jammed it in the back seat of my Corolla on the way to pick my son up at the airport.  It was a tight fit and let's say there just wasn't a lot of room for luggage back there.
So the chair project will just have to wait.  I did however, drag it into my living room so I could at least look at it and plan what I will do with it.  Please ignore my son's size 14 shoes underneath the chair!
I am participating in Wendy's I Spy Swap...I had forgotten that I signed up for that until I got an email from Wendy July 19, which happened to be the day I had surgery!  I don't usually procrastinate, but this one slipped my mind.  So I sent my son upstairs (which I am not able to climb stairs right now) to find some I Spy suitable fabric in my stash.  He very successfully returned with the appropriate number of fabrics I needed, although he wasn't too excited about the adventure.
So yesterday I got them all cut out and divided into the baggies so I could mail them to Wendy.  They are going out in today's mail.  I can't wait to get my squares in the mail!  I have never made a real I Spy quilt so this should be fun!  The frog fabric is Mr. Toad Gets Dressed by Alexander Henry...I thought it would be perfect!
My son and his friend Alex drug my sewing room downstairs basically so I can keep myself occupied while recuperating.  I had never been able to master making a lettuce edging with my Imagine Baby Lock serger, but the good news is yesterday I was able to master that.  I shortened the sleeves and the hem on a winter knit gown (a Land's End cotton knit gown that I scored for $2 at Goodwill that was in excellent condition and my size!!!) and made this cute lettuce edging! 
Lemonade anyone?

Wednesday, July 28, 2010

Fall Favorites Gift Exchange by Every Crafty Endeavor

This looks like a lot of fun!  I have already signed up!

Tuesday, July 20, 2010

GoodWill Desk Makeover

`````````
I found this desk at Goodwill, probably from a dorm room, it's older but not antique, but very usable.  I thought it had "great bones".
One of the front corners had been whittled away (why I am not sure) and it had this really ugly molding trim along the front sides only.
I popped off the trim and replaced it with some 5.5" molding that was pretty plain.  Then I filled in the whittled away spot with some plastic wood compound.
The knobs were plain porcelain, but they were chipped and crooked, so I went to Hobby Lobby (last week all their handles and knobs were 50% off) and found these darling new knobs.
The knobs were white porcelain with blue polka dots.
Here is the whole picture all finished!  I finished it the day before I had foot surgery.  Instead of moving it up to my sewing room, I thought I would keep it downstairs where I can use it while recuperating since I am supposed to be non weight bearing for three weeks.
This desk will replace a folding table that I have been using for a sewing table. 
Seven drawers!!  I can't even think of what I can do with that many drawers!
But I am sure I can come up with some ideas!
Isn't it pretty?  I am considering putting on some type of good finish on the top especially since it will have lots of wear there.   Anyone have any ideas on what to do or what products to use?
I love the new molding at the bottom below the drawers!  Looks perfect!
I am linking up to Primitive and Proper's first linky party!