Wednesday, June 24, 2009

Kitchen Towels to Baseball Bag

These are plain old kitchen towels, all cotton, cool coordinating colors...I liked the orangey-maroon funky color combination. The colors on these first two pics are the most accurate...the bottom two was taken with a flash and it made them look faded and more pink...
Quite interesting and they do look good together. So I was in Satin Stitches (probably my favorite fabric store in the world, or at least in Columbia) and saw these towels sitting beside each other. Actually I have to confess, I read someone's blog and they created bags like this with their kids for book bags. I figured if the kids could do it so could I...Sam had an 8 pm game tonight, so I decided to whip one of these up before the game (Did I mention it was 6:15 when the urge hit me? That is 6:15 pm.) Well, I cut a 4" strip off the long side of each to make the strap and folded in in thirds and ran a single line of stitching down it.
I sewed the side seams and the bottom seams of the two towels with right sides together, actually I serged these seams so they should be pretty indestructible.


On the polka dot side I used the plaid handle and on the plaid side I used the polka dot handle, just to kick things up a bit. I attached the handles to the inside and then turned down the top inside and stitched it to the inside of the bag.
I was so proud of it I took it to the ballgame tonight...but it was dark for most of the game, so no one actually mentioned that they liked my bag....just probably they couldn't see the fine handiwork there. I will use it for next weeks game to give them a second chance just in case they want to notice it.
It is big enough to hold my purse, my camera, a water bottle, a can of bug spray (lots of those biting deer flies out there), two rice crispy treats for me and in case the game gets slow, the latest copy of Real Simple magazine.

Leave it to Sarah...

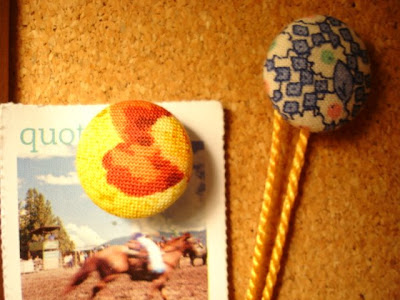
Sarah sent me some of her latest craftiness. I love these giant paper clipsand the bulletin board pushpins....These are made with the ever-popular button covers and cute fabric scraps.
And I really love these big clamp clips cause I use them all the time....

Leave it to Sarah to find these neat ideas and not only make note of them but to create her own version!! And thanks to Sarah for sending me some samples to share and use!

Wednesday, June 17, 2009

God's Garden


The flowers in my garden....there are no words to fully describe the wonder of God's creations.

The Pillow Blues

Anyone who knows me knows that I love blues--cobalt, periwinkle, indigo, cornflower, royal, sky, ultramarine, Persian, sapphire, powder and Prussian blue. I have been wanting to make some pillows for the old metal glider on my deck and am planning to paint it cobalt or royal blue this summer (hopefully within the next month). So I chose fabrics that will match the new color (currently it is a dark red).

But since we are in the monsoon season here in mid Missouri right now, I can't take them outside to photograph. So I photographed them in my yellow leather chair in my living room...and, hey, they look pretty good there too!
Anyway, JoAnns had their outdoor canvas fabric 50% off so I bought a half yard of each print (flowered and striped)...it is 54" wide and originally costs $18 a yard. I made an 18" pillow from each color and had this small piece of each left. So, wanting to get the most out of my money, I made the smaller 12 x 18" pillow from the two pieces left, one side from each fabric design. I bought the two larger pillow forms (at 50% off, so only 4.99 each) and had a 12 x 18 pillow already which I repurposed for this pillow cover. The zippers were $1 each.
So, my grand total for three coordinating outdoor pillows is....drum roll please...$22. They cost about that each at the Home Depot!!


Busy, Busy, Busy


I have been hankering to create lately...lots of projects started, and I even finished a few more.
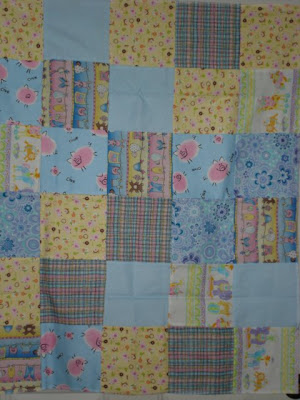
This is a baby quilt which I made from scraps from other projects. I combined six fabrics to make a really cute blanket.
I used some flannel and some cotton...and the different designs look great together.
And I love the PIGS fabric!!

Pretty in Pink

I saw a really cute toddler dress made with a t-shirt and some pretty flowery single knit cotton fabric.
I bought a t-shirt (50 cents at Goodwill) to make a "test" dress.
I bought 18" of cute pink stars fabric ($1.50 at JoAnns) and sewed it on the top half of the t-shirt. It seemed to work out OK, so I finished the hem on the trial dress (which can be used as a nightie) and then started the "real" project.
I bought a tank at Target for $4 and did the same thing....really cute!
I used my serger to make a ruffled edging for the hem...

Of course I have a cute little girl in mind for this outfit...here she is on the back of a fire truck (never mind the DANGER sign behind her head!).And because I could, I made two little baby bibs from the scraps of the dress making! They will make a handy addition to a baby gift some time later.
This is why I can make such neat things....I have a great Baby Lock Imagine serger...I can't imagine not having it since I use it for almost every sewing project. My sister Sarah let me use hers to make some baby blankets and I knew I had to have one....hers is an Imagine Wave by Baby Lock.
The background in the dresses and bibs pictures shows my ironing board which I recovered with some leftover flannel. It is the nicest ironing board cover I have ever had and it took maybe 30 minutes to make and it was free!!

Before and After Baskets....

Purchased at a garage sale for $10, these four baskets were dull and dingy...the liners were faded and outdated pink gingham. But the baskets were nice and sturdy.
I painted them with Rustoleum Satin spray paint in Warm Beige. It is a light mocha color and is pretty neutral.
I gave them with two very light coats.

Then I took apart one of the old liners to make a pattern and sewed up fresh muslin liners. The off white fabric looks great with the warm beige and they are washable and will wear forever!


I threaded some chocolate brown twill tape for the ties. I think they look great!
I had the muslin (it was leftover from another project), the paint was $4.50 and the 7 yards of twill tape was $1.50 (1/2 price at Michaels--it is actually Martha Stewart brand in the scrapbooking section)


Wednesday, June 10, 2009

Second sock complete!

The pink and brown socks from my April 14 blog are now both complete! I overcame the second sock syndrome!!
Very soft and even a bit silky...they are very nice.
Even Mama Kitty approves! Now I just need to wait until winter to wear them.

Monday, June 8, 2009

My Contribution to the Jar


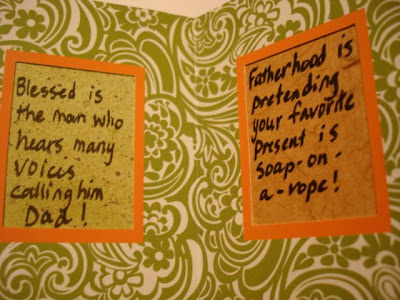
I found this little photo album at Michaels for 47 cents. Instead of putting photos in it, I put blank pieces of card stock paper..I hand wrote different quotes, a few Bible verses and personal sentiments. It will fit perfectly into the jar....


I think this project is now complete!


Cricut Love

I started playing with the Cricut and got carried away, first I made this cute fishing pole...

And then I made these darling four layer hydrangeas....they turned out really cute.

And then there's the ladybugs...I could just play with this machine for hours (and actually did)...how cool to be able to make all the letters and die cuts that you could ever need or use??
Maybe I will add a Cricut to my wish list!!

Father's Day Jar

My family is making my dad a jar full of memories for Father's Day....
I decorated a half gallon jar (WalMart for $3) and we are putting letters, notes, photos that represent a good memory or fun time with Dad/Grandpa.
This is how it all started...scrapbooking supplies...I used a friend's Cricut and made the cute little die cuts to decorate paper on all four sides of the jar.The lid was made with letters made from the Cricut and surrounding by rows of tiny dots of acrylic paint. I made lots of rows....
I used designs that reminded me of Dad....and made the tag from scrapbooking paper with a star eyelet holding it all together. I found some tiny cute brown ribbon that seemed to be made for the jar colors.

I had to include the John Deere tractor and the barn too!

Now the best part will be stuffing it full of fun stuff for Dad...
See this post for my personal contribution to dad's jar.
I know this is wayyyy early for a Father's Day post, but if you have a large family like I do, then it is best to get started several months in advance. It would also make a great birthday present or a Mother's Day gift as well.

Footnote:  My Dad passed away eight weeks ago, so this post is even more meaningful to me now.  He really enjoyed reading the contents of the jar and looking at all the photos and things that we had included for him. 

Wednesday, June 3, 2009

Sort of creative...

As the creator of this blog, I can decide what falls under the label creative....anyway here is Sam my son. I really did create him, but I am putting today's baseball practice pictures here to brag about him. We went to what we thought was a game, but the game was cancelled at the last minute (because of a leak in the sprinkler system).
So the guys had some batting practice.
Sam hasn't had much practice because at the beginning of the practice season he broke his thumb. This would have been just his second game to actually play....
Just yesterday he was a baby....


Ladybug Pincushion by Sarah

I would REALLY like to claim this as my own, but my sister Sarah made this for me for my birthday (and gave it to me tucked neatly inside a Miss Piggy drinking glass, see below). It is a cute little pincushion made from a tiny clay flowerpot. The ladybug pin on top is THE best part...I am an avid ladybug fan. Here is the view from the top...very cute!!


Sarah and I have this long standing obsession with gag gifts involving Miss Piggy...I think it started with a Miss Piggy nightshirt, but I might be wrong about that.