Saturday, June 26, 2010

Wicker Stool Makeover

I found this cute stool at the Goodwill store....it was $5.  The original price tag was on underneath and it was $34.99.  I thought it had some potential so it came home with me!
I didn't like how the pattern in the fabric wasn't centered.
I took it apart and it was pretty easy.
I took all the staples off the underside of the cushioned area and then used the fabric to make a pattern.  I found the brown circle fabric at JoAnn's for $3 a yard.  So for $1.50, I recovered the cushion, adding some thick quilt batting for extra padding.
I spray painted the wicker a satin black.  And I started stapling the new fabric cover on.  It was at this point that my cheap electric stapler started malfunctioning, firing two staples at the same time and making me feel rather cranky!
So I forgot to take any pictures of the process...but here is the finished product...
I am really liking it...I like how it looks with the leather chair.

Monday, June 21, 2010

Woolen Wreath Giveaway at Along for the Ride

I am offering this giveaway on Laura's blog Along For The Ride...The wreath is made from recycled felted wool sweaters. 
It goes with any season because the ribbon is not attached and can be changed...I can see a bright red polka dotted one for Christmas time or a bright yellow ribbon for spring time.  Anyway, go visit Laura's blog to find out how to win this beautiful wreath!  And while you are there, check out the rest of Laura's blog for her great ideas!

Friday, June 18, 2010

Barkcloth and other interesting stuff

I love barkcloth...even before I knew what it was...I love the slightly rough nature of the cloth, the designs, the fact that it is a strong fabric. I recently went to an antique mall and was surprised to find so much of it there.
Here is a bit about barkcloth...

The original barkcloth was quite literally made from the bark of trees. To make this type of barkcloth the inner bark of certain types of trees (primarily trees of the Moraceae family)
is beaten flat and formed into sheets.
These sheets are then used as a primitive fabric in many different applications.
If you hear the term barkcloth used today, however, it is most likely referring to a different type of fabric all together. From the 1930's through the 1960's (and even early into the 1970's) one of the most popular decorating fabrics was also known as barkcloth. In this case, the term barkcloth refers to the weave of the fabric which is thick, nubby and slightly textured.
 Barkcloth got it's name because the texture of the fabric bears a slight resemblance to tree bark.
Barkcloth fabric is often made of cotton, although it can be made of other fibers as well including linen, rayon, polyester, and fiberglass depending how old the fabric is.
Although thicker than a standard cotton, barkcloth is surprisingly soft and drapes nicely which made it a great choice for draperies and curtains.
Because of it's thick texture barkcloth is also quite durable which also made it well suited to being used as an upholstery fabric.
I found all this barkcloth at Artichoke Annies Antique Mall...they had lots of this great fabric. 
My obsession with all things cobalt blue took over after I drooled over the barkcloth and I found this blue and white floral cotton fabric....
And this Holland Delft collection...I love the baby shoe in the front. I used to collect baby shoes like that.  I had over 200 of them at one time.
I love the checkered bowls and the cup piece with the bluebird eating blackberries...
and the bluebird plate.
Another Holland influence with the windmills and sailboats on this tablecloth.
And I love this willow cane seat bench. It is kid sized and I imagined children sitting on it...it looks well loved.
And then I turned around and saw the Jolly Green Giant!  You never know what you will see in an antique mall!!

Chalkboard Sign Redo

I found this frame/easel/whatever you want to call it at the Salvation Army store...it was really dirty and had two clear acrylic pieces with a photo between them inside...those just slid out and I replaced them with a piece of particle board that I sanded and then painted with chalkboard paint.  It was a natural wood that had lots of scratches on it so I decided to paint it blue!
I thought I had taken a before picture, but couldn't find it...maybe I didn't take one!
Anyway, the whole project cost only $4.  The frame was $2 and the particle board was only $2, I had the blue paint for the frame and the chalkboard paint left over from other projects.
The board slides out the bottom and there is a little plastic tab you turn to keep the board in...
My sister Sarah and I hope to have a booth at a craft show after Thanksgiving and I thought this would be great for a welcome to our booth sign!  Until then I plan to use it around the house....
I'm really liking it!

Yippppeeee!

Yes, it is true, I finally got a new blog design that I like thanks to my niece Liz who is the IT expert!!  She made the collage for me, she arranged my blog, she did it all while I snuggled with my great niece, Miss Audrey Lou!
So it's looking much better around here...
Maybe as pretty as these Indian Blanket Flowers I found at Menards!
Look at the one in the middle of the picture...two of the flowers are connected at the center...Siamese twin flowers!

Wednesday, June 16, 2010

I have been featured!!

UndertheTableandDreaming
On Under the Table and Dreaming!  So exciting! Go to Stephanie Lynn's blog to see all sorts of wonderful ideas...
Like this....


And this!
Also of some concern is the fact that I have been having all sorts of design problems with my blog and am going to find some help today!  My pictures are aren't right and well, let's just say my blog isn't me at all right now!
Hopefully I will get it figured out today!

Friday, June 11, 2010

A Memory Pillow from Dad's Shirt

If you read my blog you know that my Dad died recently.  I asked my Mom for a few of Dad's shirts to make pillows for my son's bed.  I thought it might be nice for my son to have something of Dad's that could also be useful.
The shirts are XL size, I made this one into a 16 inch pillow.

I cut an 18" square from the center of the shirt, the buttons will be the closure for the pillow.
It looks like a rectangle here, but it really is a square.  Next I cut an 18" square from the back of the shirt.
I pinned the two squares together with the buttons on the inside, so the fabric is right side together.
I sewed a 5/8" seam all around the squares and then unbuttoned the front and turned the pillow cover right side out.
I ironed the edge seams carefully, and then stitched about 1/2" from the sides all the way around to create an envelope style edge.
Here is the finished product!
This one looks great on the couch and I have another shirt that is a soft brushed flannel which will make a very nice pillow too!

Wednesday, June 9, 2010

Sam's View of Cancun

My son is in Cancun since last Friday...I asked him to take some pictures for me since I was not able to go.  He agreed to take two pictures a day for me.  This was the first one. I got six pictures and then he notified me he wasn't taking any more!  Today I go pick him up from the airport...maybe he will have more.  Or maybe not...

Thursday, June 3, 2010

Creative Container Planting

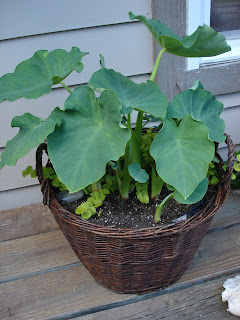
I bought this basket at Salvation Army for one or two dollars, looks great with some creeping Jenny and an elephant ear bulb. 
Very easy and cheap!
Another cheap basket, painted pink already, I filled it with pink and white dianthus and alyssum and some more creeping Jenny!
Mexican petunia with lizard tail and yes, you guessed it creeping Jenny!  I planted one of those watering bulbs, not for their watering abilities, but just for a zing of color!
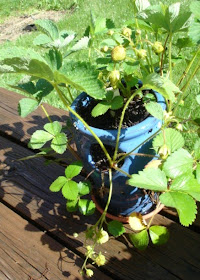
A tiny strawberry pot with probably way too many strawberry plants, but we have berries already, I am hopeful it will continue to be happy and produce a few berries.
Groups of three clay pots stuck together....lots of color tossed in the pots.  Most of these I raised from seed, started in late March.
I planted one hanging pot full of just creeping Jenny, one of the darker color leaves....it grows probably five inches a day.
Another hanging plant on the deck, I try to add some color, some height and some vining to each basket or pot.

This is Sweet William that has outgrown its small flowerbed.  So I dug it up and put it in a pot on the deck for now, added some creeping Jenny and some sheet moss to keep the moisture in.  I am curious to see if it will bloom for me in a pot. 
I love sea shells and have a small collection...I scatter them around the plants and all over the deck and my water garden...
adds a beachy touch!
Sometimes I even have fresh flowers on the deck...queen Anne's lace and black eyed Susans last really long.  These are flowers I found in the WalMart parking lot, in a parking space.  There were 8 long bundles of them and they looked a bit droopy, but I brought them home cut off the stems and they have been looking nice for over a week!
I planted ornamental grasses in pots behind my water garden...I am hoping I can leave the pots there all winter and they will come back up next year. I used purple fountain grass and a variegated ribbon grass for these pots. And of course some creeping Jenny too!
This pot was free, given to me by a friend, so
I filled it with the leftovers from my other plantings and set it behind the water garden. 
The container plantings make the water garden look lush and tropical....the fountain sounds are so relaxing summer evenings. 
I bought this rough wooden container for $10 at a second hand store and filled it with small mosaic pots of the darker creeping Jenny...I thought it added a rustic look to the deck.
Notice the yellow cat ears in the bottom of this picture...she is inspecting things closely!
I also love gazing balls....
And I add ceramic balls to my pots for additional color.  Even my cucumber bush gets some extra color!